https://slickshares.com/tree?u=rm

Saturday 5 February 2022

Tantalizing Tiling


Disclosure: This post contains some affiliate links to products that I use and love. If you click through and make a purchase, I’ll earn a commission, at no additional cost to you

Tantalizing Tiling

Simple Tiling Additions that Make a Huge difference


It was missing something. The double sink was there fitted perfectly into the built-in cupboard. The cupboards had a clean crisp finish with the matching handles and soft closing hinges. The stove and fridge were in their places, sparkling. Yet somehow the family kitchen was missing that extra something, that one simple finish.

 
The back splash! 
 That small bit of real estate between the sink and the window sill that runs along the kitchen wall and includes the stove area. This simple bit of tiling drastically improves the kitchen and adds that X-factor, that feeling of "finished" to the kitchen.

Today in this blog I will be talking about tiling, the materials, tools and techniques. Tiling isn't difficult but if not done properly and without a little planning, the finished product will come out looking untidy and amature. So you have a room or space you want to spruce up. Where do you start? Your local hardware, flooring specialist or tiling store is where you start. Shop around, ask for samples. You are doing one of two things, complementing existing furniture or contrasting existing furniture. Place your samples on the areas you wish to tile, stand back and view. Now how do you feel? Is the tile, as it lays in its place, making you feel the way you want it to make you feel? Do you feel happy when you look at the tile next to the rest of the furniture?


There are many blogs and articles on choosing tiles. In the end, does it look good to you. There are however some guidelines to follow. Light coloured larger tiles give the illusion of space. Using ceramic and porcelain tiles are easier to maintain than natural stone. Ceramic and porcelain only need a wet mop and you done! Glass tiles are beautiful but should be left for walls. Glass tile become slippery when wet and this is dangerous.
 Now you have chosen the tile or tiles that make you happy. They either compliment and blend or they contrast and shock. Beautiful.
But how many tiles will you need? 
To calculate the square meterage you need the length and breadth of you area. L x B = Area squared. Take that total to the tile supplier. On the box usually it tells you how much area a box covers. 

 If you are taking on the job yourself and it's your first time, take an extra box or two. These extra boxes are for spares and for you when you cut a tile incorrectly.  Next on the shopping list, grout. What is grout? It's the stuff that gets squeezed between the tiles. Tile grout prevents water from seeping under the tile. It can create a seamless tile appearance when matched to the tile or create beautiful contrasting lines.
 Adding to the list is tile adhesive. This is essentially the glue. There are many brands on the market. Speak to the salesman at the hardware store to help you buy the correct stuff. Remember expensive doesn't necessarily mean best. 
 Get spacers, these are plastic crosses. They vary in thickness. Depending on the size of your tile, will determine the spacer size. There are usually displays, have a look at them this will give you a good indication of what size to choose. 
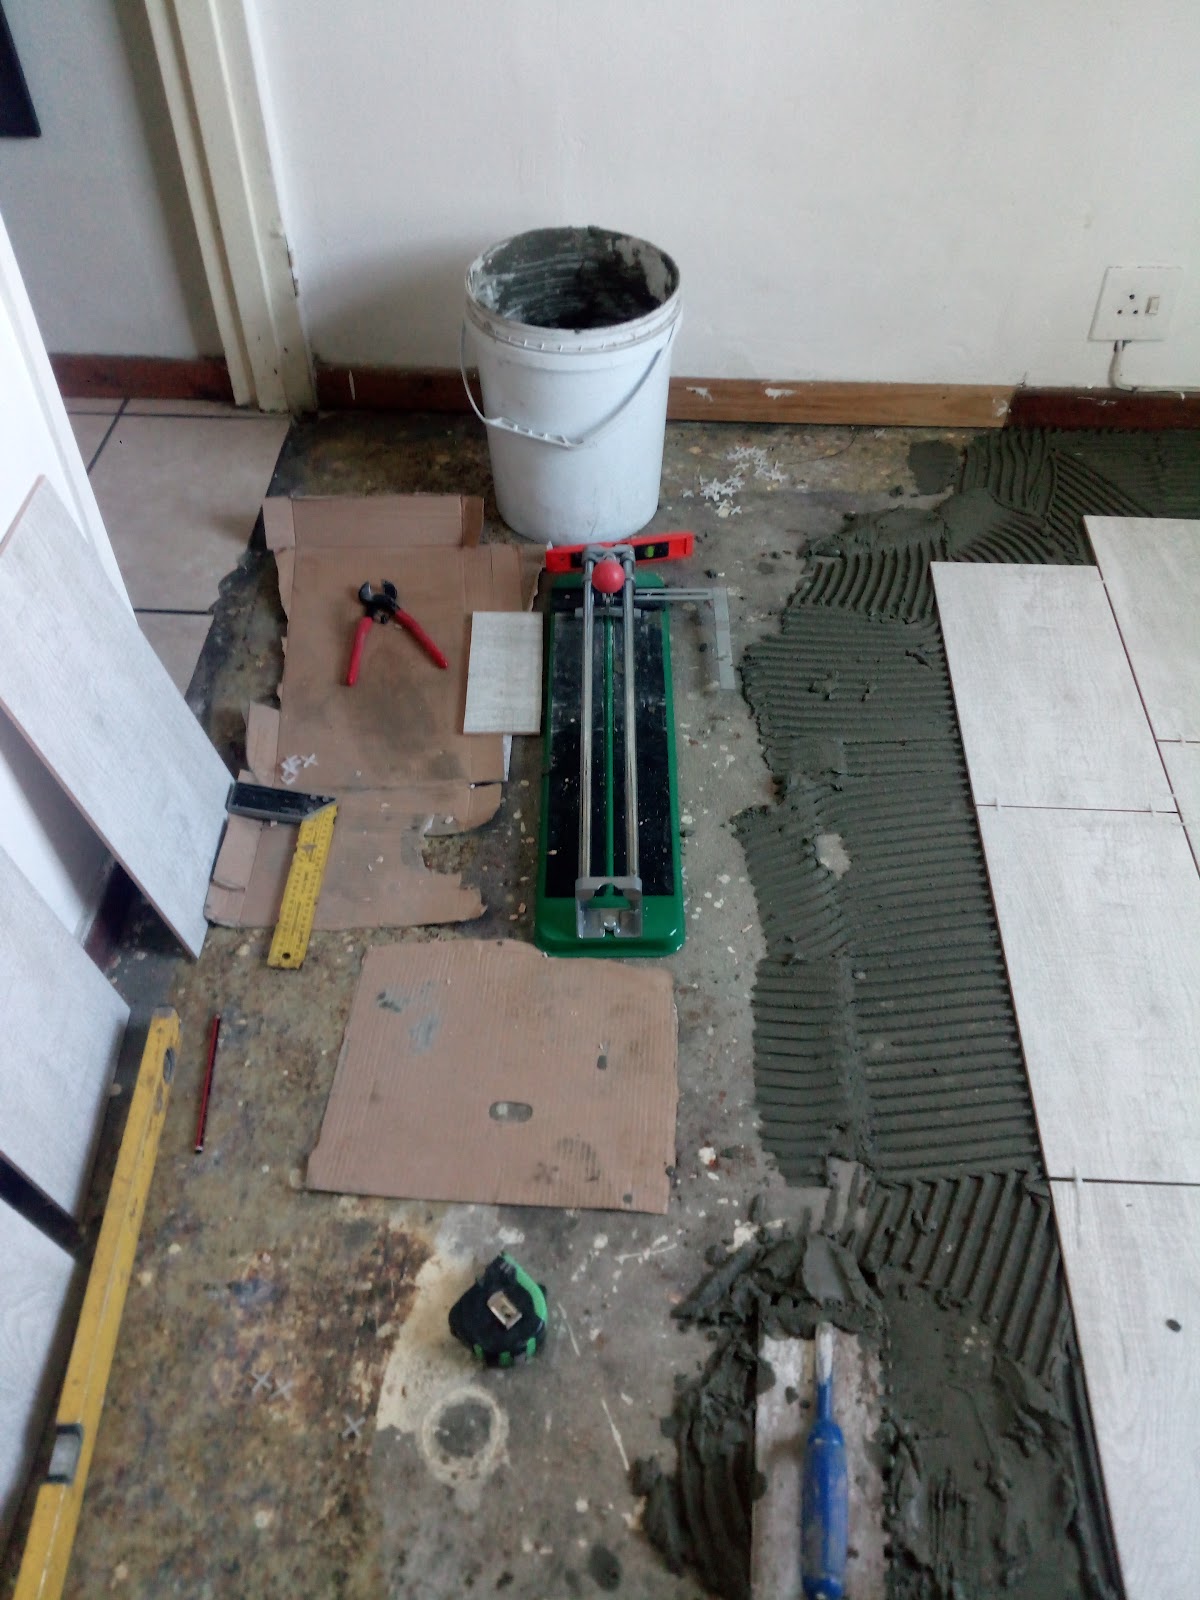
Tools. If someone is doing the tiling for you then at this point your job is done. however if you're gonna take it on yourself then continue down to the tools isle. First and most obvious is the tiling trowel or notched trowel. 10mmx10mm notches for floor and wall tiles. 3mm x 3mm notches for Mosaic tiles. Then gauging trowel to scoop the adhesive out your bucket. Tape measure, pencil or marker and you will most definitely need a tile cutter accompanied by a pair of nippers. If the tile doesn't break cleanly on the edge a pair of nippers, tile pliers, can be used to break off the jagged chips on the edge. Some rough grip sandpaper to sand the edge smooth. 100 grit, 80 grit should be fine. Spirit Level to level your tiles.


Since you're a beginner, the space you are tiling is small.  Splash back, a small room, small wall space etc.  Plan your space, if its floor, divide your room into 4 parts.A cross. Starting in the middle working your way to the walls.  This will ensure cuttings at the skirting. 
Alternatively, from the door lay full tile using wall as ruler. This way you will see full tiles as you enter the room and cutting out of  the eye sight.   I personally like this method, working from the threshold of the door.  Work one line of tiles then turn at the end and work one line across.  Its a big L shape.
No adhesive yet, you planning your floor out first like a mock exam. 
Laying your tiles out first is a good idea if you chose tiles with wood grain print. Match up the grain to flow.  
Now for the real thing.  Move your tiles one side, scoop tile adhesive with gauging trowel and dollop on the floor. 


Dollop, dollop about 3-4 scoops, not too much keep it tidy. 
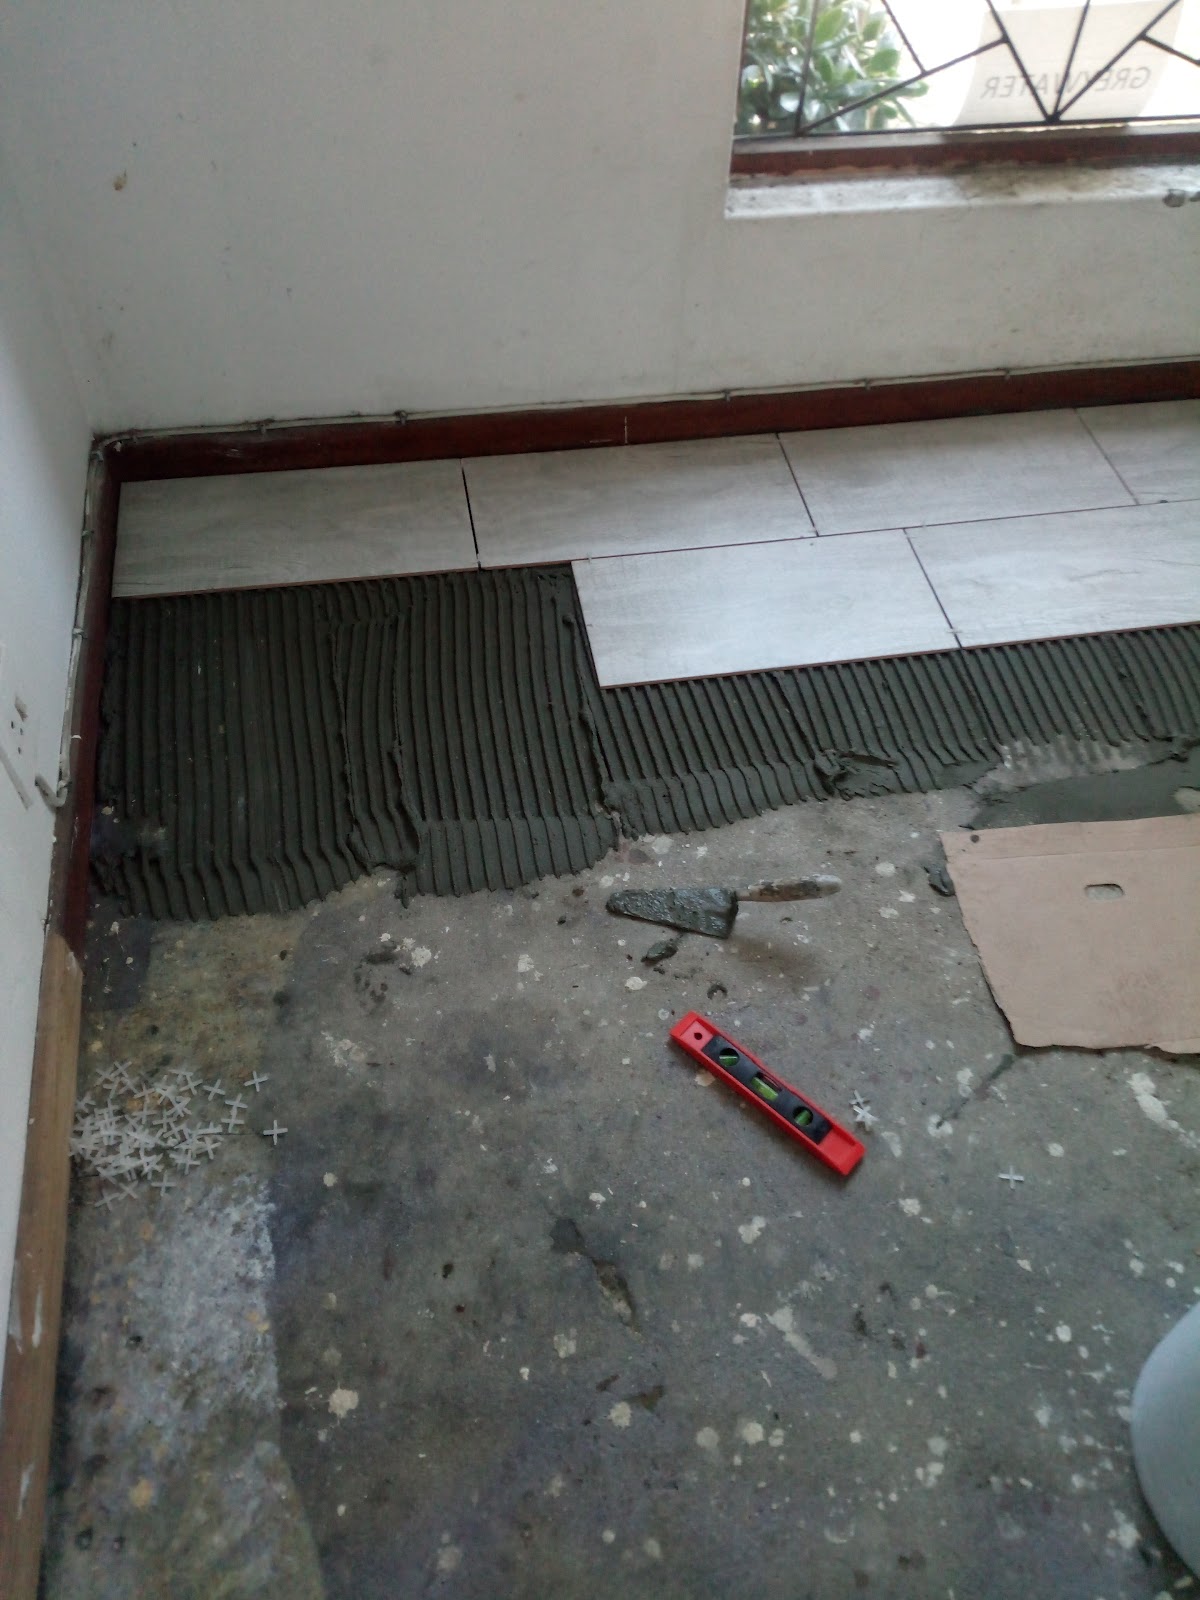
Now take your notched trowel and spread, making lines from one end to the other.   
Place a tile onto adhesive and spirit level on tile, push down firmly leveling tile at the same time. 
Sometimes, in the case of a larger tile, you may have to use a Mallet .  Don't hit hard the tile may break. Tap lightly.
Next tile same thing, line up edges and corners. use plastic spacers between tiles to get and keep symmetry.
And you're tiling!

Once you get to the walls you'll need to cut.  Measure from tile to wall and subtract spacer thickness. Match tile edge to tile edge and cut side against skiting or wall. If against the wall then the skirting goes on top and covers uneven cuttings. If the skirting is already in place then a quarter round molding can be placed over cut edge.  ok that was floor tiling.
With wall tiling it will be similar with the wall being your floor and the counter top or skirting being your walls.


Now once the tile adhesive has set, Check the product packaging for drying and setting times, its time to grout. Mix it up so its thick yet smooth. then using Chalking tool force grout between tiles. It can be time consuming. Clean off excess grout let dry over night and then mop with damp mop. 


Wednesday 3 February 2021

Get through power outages


Disclosure: This post contains some affiliate links to products that I use and love. If you click through and make a purchase, I’ll earn a commission, at no additional cost to you. 

                         
So with the return of rolling back outs, load shedding🙄 we are once again faced with the inconvenience of having to sit through two and half hours of darkness and the risk of loosing appliances to an electric spike or surge.
In this blog I explore a few practical ideas and options for getting through load shedding.
I'm not a technician or mechanic but I am a practical thinker and a recipient of Eskoms load shedding...and facilities management is my occupation. So without further delay  here are my thoughts.
          
Preparation is the name of the game. To save money and not spend anything or as little as possible on machines or tech we're gonna need to plan ahead. Get the load shedding schedule.
I use the app called "Telkom se push" available from Google play store. There are many such apps used to view the load shedding schedule. One can also get the schedule from the Telkom website.  Now get the schedule for your area.  
If you're lucky and load shedding is scheduled for day time, then plan an outing for those two and a half hours. Go for a walk, take the dog, the spouse and the kids for a walk. Two and a half hours....wearing your masks.  If load shedding is in the morning hours over the weekend, well, that's a no brainer, sleep in! 


For early evening till night time load shedding, my family and I  finish up the cooking before the outage. There have been occasions were we have also braaied/BBQed through a load shedding period. Its fun especially if you have kids.  Load shedding is a good opportunity to light up a fire throw some chops and worse on the grill. This option also work during the week but weekends are best.  So we're either having supper by fire light or after load shedding. After load shedding is a quick warm up in the microwave oven, eat and then to bed.  All the kids get washed and on with pajamas! If you've gone the fire route then bath time will obviously be after, once the power has returned.  All devices get charged. Make sure tablets, phones, laptops, little power banks etc. are charged and set up any lighting you may have. So if you have battery operated lamps or lights even candles light 'em up.


 For peace of mind and not have to think about when and if load shedding is happening a back up system needs to be installed.  We have a few choices here.  There are mainly two, battery and engine.  Generators and Inverters


Lets chat about the generator, two basic types, invertor generator and open frame generator.  Invertor generators have variable speed, meaning when the load is heavy the Genny runs faster and when the load is lighter the Genny runs slower. This feature save fuel, while the open frame runs at one speed whatever the load demand.  The open frame generator is heavy and usually needs two pairs of hands to move it, however for the same capacity the inverter generator is lighter and easier to move around. The Inverter generator also comes in a "briefcase" design making it practical to lift, move and pack away in a cupboard.  Another star goes to the inverter Generator as it runs quiet, just a low purr, making it great for use in flats, complexes, camping sites, business centers etc., unlike the open frame that runs deafeningly loud. I'm sure you know the sound all to well, you've seen them grinding away at carnivals, camp sites and building sites. The open frame wins when it comes to price they are less expensive than the inverter generator. Open frames are robust and best suited for building sites and carnivals producing raw energy. To run your home its best to spend a bit extra and get the inverter generator that produces clean power suitable for all your home appliances.
However bare in mind that generators are engines and need fuel to run. They also need to be maintained meaning oil changes, filter cleaning/changing and now and again an off load maintenance run.  All these are expenses to consider. 


Ellies 1440W/2400VA Inverter UPS 

Deep Cycle Battery (For Use With Inverters)
Inline Interactive UPS


The next option is battery. UPS and inverter.  In simple terms a Uninterrupted Power Supply (UPS) is a box with a charger, a battery and an inverter that converts DC to AC current. It is  designed to protect your data meaning your computer will stay on giving you enough time to finish up and save. UPS typically have 15-20 minutes battery life.  UPS is a sensitive machine that cannot be used to run home appliances. Kettles, NO! Fridges, NO! Offline UPS are for your desktop, hard drives/servers and laptops. This piece of hardware should be mandatory for anyone with a home office as it also protects equipment from power surges etc. There are inline interactive  UPSes that have been used to run Android box, smart TV, LED lamps, Wi-Fi router and charging of cellphones for the two and a half load shedding period. However UPS should not be used for general home usage.
To keep your home running normal for the load shedding period is the next option, inverter hooked up to deep cycle batteries. For the technically savvy, inverters and batteries can be bought separately and connected directly to the DB board.  This is a more permanent installation.   But for the layman there are easy to use plug and play packages. A battery bank on wheels with its own inverter simply plug it into the wall and then plug into the inverter a multi plug for the appliances you want to keep on during load shedding.  
Remember the size of your backup will determine the cost and how many appliances can be run. Like with generators there is maintenance however it won't be as involved as the generator, if any at all. UPS and inverters usually have their batteries replaced after several years of use and this also is dependent on usage frequency.
Which ever option you choose to go with calculate and prioritize accordingly by deciding what you will need during the blackout and then proceed to add up the watts. The watts can be found behind or under the appliances you wish to running. When you are ready speak to the supplier/manufacturer they will advise and supply you with suitable machinery/tech.


Tuesday 12 January 2021

Fowl Run Construction part 1

                     
Disclosure: This post contains some affiliate links to products that I use and love. If you click through and make a purchase, I’ll earn a commission, at no additional cost to you. 


What happened in the movies is happening in real life.  A virus got loose and is leaving death and destruction in its wake, except, lucky for us no one turned into zombies.

However as you know Covid-19 continues to turn our lives upside down any have lost their livelihoods, lives and loved ones to this disease. Covid-19.  As you know many countries went into national lockdowns. You remember, we couldn't leave our homes only for emergencies and to top up on our groceries. 
This event made me realize that my family and I, and I'm sure many others were not prepared for this situation at all.  
"We need to be ready for next time", I thought to myself.
 Veggies and meat. 
Farming!
Farming on a small scale, very small scale. Small game, small planting vessels.

Veggies and meat. Veggies I'll discuss in another blog.
For now, The Meat.
The meat, the live stock, obviously no cows, sheep, goats or pigs especially for those of us in residential, urban areas. Its got to be small and manageable preferably quiet, for the neighbors, so that's Rabbits, chickens( noisy), pigeons... Rats?
I chose chickens. Chickens need to be housed, well, any animal you decide on will need residence.


I built a foul run and that's what this blog is about today.


 Shutter ply Sheets, a brick pallet and old lockers.
I started with the old lockers I got gifted, second hand. My plan was to use the lockers as nesting boxes. They are the perfect size and they have doors, all I needed to do was cut entrance holes for the birds to enter through.
As seen in the pictures below. We measured, marked and cut out the holes using a jigsaw.


Measure and mark
Cut out


Right! So once the holes where cut we placed the nest boxes on the pallet. I was super lucky because the length of the lockers fitted perfectly on the pallet. It was actually smaller by about 10mm which was actually great, it gave me 5mm play on either side.

fix boxes
painted nest boxes with handles moved


So I acquired two sheets of shutter ply, second hand. Since the pallet was to be the floor it dictated the size of the coup, so naturally I cut the shutter ply to size, remembering to minus the thickness of the board at two ends so that it would not end up bigger than the pallet when being assembled. (phew that was a mouth full).  As seen in the pictures above three boards to make the walls.  I nailed the boards to each other and to the pallet.  The nest boxes I screwed into place, through the coups walls and to the floor.  After painting the nest boxes I moved the handles to make it easier to open. Now with the fourth board, I used as a door for maintenance.  I measured the space between the top of the box to the top of the wall and cut. I had some old door hinges that I used.   As can be seen in the pic below.


The Beam across the door is to prevent the handles getting damaged.
.
Once again lady luck was on my side, I had just replaced a roof sheet on my house so I used that to roof my fowl run. Three meter roof sheet cut in half covered the coup perfectly. Incredible!  I went around with a tube of left over silicone and plugged up all the holes and over the nails. 
Side note before fixing one side I cut a little door into the sheet. Chicken size.


I just needed a coat of paint, protection from the weather. For that I got my team in. They did a great job.  We used plain old waterproof paint. Left overs.

The fowl ran could not be completely finished as I ran out of material. So this is going to have to be part one and will have to be continued.  But so far it looks great and the boys also have a  "doll house" to play in, they call it their tuck shop.


Then we got to look as getting these guys to move into their need home.  Because they are free ranging it at the moment and making a lot of noise.


Thank you for reading and stay tuned for part two when we extend the run.
Like, Follow, comment and share.


Sunday 19 April 2020

Leaky Rotten Window Frame Repair


Disclosure: This post contains some affiliate links to products that I use and love. If you click through and make a purchase, I’ll earn a commission, at no additional cost to you. 
Leaky Rotten Window Frame!
When water is an unwanted guest


One of my clients had waterproofing issues. Whenever it rained water would seep in somewhere round the window. This resulted in the wooden window frame becoming rotten. When water is an unwanted guest it damages structurally, aesthetically and leaves bad smells.
In this months blog I will talk about how I repaired the window and highlight carpentry and glazing points. 
Restoration of rotten.
When I inspected the window the first time I thought, " change entire window to aluminum." 
I started the feel the fears. Big job, will I measure properly? Will the window to be sealed properly? Will I, will I, will I? I went home nervous. 
I returned the following week.  Climbed up to have a closer look, still anxious, and as I scratched and measured my anxiety and fear began to dissipate. I began noticed that it was only the bottom the sill that was damaged. The wood was so damaged, rotten thant the glass sunk into the wood allowing water to seep in at the top of the window.
I proceeded to measure up what I need and make a shopping list.

Once I had everything I needed, wood, window putty, panel pins, nail-in anchors, screws, foam seal tape, and paint it was time to start demolition. The breaking out of the damaged wood was relatively easy as the wood was badly rotten, soft, spongy. Added to that the joint were basic butt joints so the will pulled out easily.  The mullions had also started to rot at the bottoms. The shortest one I removed and the long ones up cutting away the rot. 


 The brickwork and plaster were still in perfect condition which meant I could fix the frame by drilling into the brickwork and fixing with my nail-in anchors. Meanwhile I had treated the new wooden lengths with wood primer. They were now ready to be fitted into their new positions. I ran a strip of foam seal along the underside of the new will. Now I slide it in under the mullions, fix with waterproof wood glue and then long screws through the side of the will up into the mullion.  Close the screw heads with wood filla. 


Next I review the beading. Rotten? Throw away and salvage what I can. Sand them down, nice and clean. Refit beading internal first.  It took a while, cutting mitres is a story, got to get the joins tight. No gaps.  
Now I apply one coat of external paint. I like plascon wall and all.
Stand back....looking good!!!
While the paint drys and I admire my carpentry skills, I work a lump of window putty in my hands. I press it, squeeze it, knead it, roll it into a Ball and catch myself making figures and faces with the putty. Stop that!
Start thumbing putty onto the inter beading all the way round then fit glass. Gently press the pane till the putty is pressed up against the glass uniformly. Top beading first, tap, tap, tap my panel pins then bottom and sides. Between the glass and the external beading I squeeze in more putty. 

I did this for all the window panes. Then I went around with the white paint adding final coat of paint.
I thoroughly enjoyed this job.
Specially when the client smiled and breathed a sigh of relief. No more water damage and it looks like new.
Before I close off a few points to remember.

  • Try to keep joint as close and tight as possible.
  • Work window putty till its soft. If its hard, a bit of turps or linseed oil can be added to soften.
  • Roll putty into sausages and press into frame first, then fit pane.
  • When measuring for the glass pane remember the glass should be smaller than the frame. Subtract about 5mm off your total. This will give 2.5mm gap.
  • Allow window putty to dry hard first before you paint.